Introduction
IP aliasing is a special configuration of your dedicated server network, which enables you to associate several IP addresses to only one network interface .
The aim is to create a virtual interface above eth0, which will be named eth0:0 and will attach the additional IP (or Fail over IP) to your network interface. Here are the explanations for the configuration via SSH. You can also do it directly via your webmin, others section, then files management.
| DEFAULT_SERVER_IP: | The primary IP of your dedicated server. |
| IP_FAIL_OVER: | The Failover IP you want to configure |
Requirements
- A dedicated server
- IP failover(s)
- Knowledge about SSH
Applying the configuration
Redhat 7.2, CentOS & Fedora
First we copy the file of eth0 interface and we rename it eth0:0. This will enable you to edit the file in peace:
cp /etc/sysconfig/network-scripts/ifcfg-eth0 /etc/sysconfig/network-scripts/ifcfg-eth0:0
We can now edit the file eth0:0 to replace the IP:
editor /etc/sysconfig/network-scripts/ifcfg-eth0:0
First of all, replace the device name, then the existing IP by the failover / additional one that you have received by email:
DEVICE="eth0:0"
ONBOOT="yes"
BOOTPROTO="none" # For CentOS use "static"
IPADDR="IP_FAIL_OVER"
NETMASK="255.255.255.255"
BROADCAST="IP_FAIL_OVER"
Now you just have to assemble the new interface that we have just added:
ifup eth0:0
During a reboot, the interface will automatically be assembled.
If operations 1 to 3 have been correctly carried out, the IP shown in eth0:0 file must be “pingable” from another machine.
If you have several additional IPs, you can do the operation again by using eth0:1, eth0:2 and so on.
Gentoo
First, we backup the network configuration file to be able to revert at any time:
cp /etc/conf.d/net /etc/conf.d/net.bak
We can now edit the file to add the ip. Under Gentoo, an alias is directly added in eth0. We don’t create any eth0:0 interface (as under Redhat for example)
Important
The default IP of the server must remain on the same line as config_eth0= in order to make sure that some specific handlings in OVH network work correctly
After netmask 255.255.255.0, Press Enter and add your IP (DEFAULT_SERVER_IP must obiously be replaced by your server IP)
editor /etc/conf.d/net
You must add:
config_eth0=( "DEFAULT_SERVER_IP netmask 255.255.255.0" "IP_FAIL_OVER netmask 255.255.255.255 brd IP_FAIL_OVER" )
Your /etc/conf.d/net file must contain the following:
#This blank configuration will automatically use DHCP for any net.
# scripts in /etc/init.d. To create a more complete configuration,
# please review /etc/conf.d/net.example and save your configuration
# in /etc/conf.d/net (this file :]!).
config_eth0=( "DEFAULT_SERVER_IP netmask 255.255.255.0"
"IP_FAIL_OVER netmask 255.255.255.255 brd IP_FAIL_OVER" )
routes_eth0=( "default gw DEFAULT_SERVER_IP.254" )
In order to ping your failover IP, you just have to start the network interface again
/etc/init.d/net.eth0 restart
If operations 1 to 3 have been correctly carried out, the IP shown in eth0:0 file must be “pingable” from another machine.
You can therefore insert an additional IP line by line. However, it is important that the default IP remains on the same line as config_eth0.
Debian & derivatives
First, we backup the network configuration file to be able to revert at any time:
cp /etc/network/interfaces /etc/network/interfaces.bak
editor /etc/network/interfaces
You must add a secondary interface:
auto eth0:0
iface eth0:0 inet static
    address IP_FAIL_OVER
    netmask 255.255.255.255
To make sure the secondary interface(s) is brought up when the eth0 is activated we must add the following line to the eth0 configuration:
post-up /sbin/ifconfig eth0:0 IP_FAIL_OVER netmask 255.255.255.255 broadcast IP_FAIL_OVER
post-down /sbin/ifconfig eth0:0 down
So if you had two Failover IPs configured, the /etc/network/interfaces file would look like this:
auto eth0
iface eth0 inet static
    address DEFAULT_SERVER_IP
    netmask 255.255.255.0
    broadcast xxx.xxx.xxx.255
    gateway xxx.xxx.xxx.254

    # IPFO 1
    post-up /sbin/ifconfig eth0:0 IP_FAIL_OVER1 netmask 255.255.255.255 broadcast IP_FAIL_OVER1
    pre-down /sbin/ifconfig eth0:0 down

    # IPFO 2
    post-up /sbin/ifconfig eth0:1 IP_FAIL_OVER2 netmask 255.255.255.255 broadcast IP_FAIL_OVER2
    pre-down /sbin/ifconfig eth0:1 down
Restart your network interfaces to activate the new Failover IPs:
/etc/init.d/networking restart
CPanel
First, we backup the network configuration file to be able to revert at any time:
cp /etc/ips /etc/ips.bak
Edit the file /etc/ips:
editor /etc/ips
Add the ip to the file:
IP_FAIL_OVER:255.255.255.255:IP_FAIL_OVER
Add the ip in /etc/ipaddrpool:
IP_FAIL_OVER
Restart the service managing Failover IPs:
/etc/init.d/ipaliases restart
HG Servers
For HG servers which are delivered with 2 Ip addresses and 2 network cards, it’s necessary to add the failover Ip in the routing rules:
- SECONDARY_NIC_IP: Initial IP of the secondary Network Interface
- DEFAULT_SERVER_IP: Initial IP of the server (primary Network Interface)
- FAILOVER_IP: Your failover IP
postup() {
    /sbin/ip route add default via SECONDARY_NIC_IP dev eth1 table 223
    /sbin/ip rule add from DEFAULT_SERVER_IP/32 table 223
    /sbin/ip rule add from FAILOVER_IP/32 table 223
}
A example file on a HG server with Gentoo distribution gives:
This blank configuration will automatically use DHCP for any net.*
scripts in /etc/init.d. To create a more complete configuration,
please review /etc/conf.d/net.example and save your configuration
in /etc/conf.d/net (this file :]!).

config_eth0=( "DEFAULT_SERVER_IP netmask 255.255.255.0"
"DEFAULT_SERVER_IP netmask 255.255.255.255 brd DEFAULT_SERVER_IP.255"
)
routes_eth0=( "default gw DEFAULT_SERVER_IP.254" )

config_eth1=( "FAILOVER_IP netmask 255.255.255.0"
"FAILOVER_IP netmask 255.255.255.255 brd FAILOVER_IP.255"
)

postup() {
    /sbin/ip route add default via SECONDARY_NIC_IP dev eth1 table 223
    /sbin/ip rule add from DEFAULT_SERVER_IP/32 table 223
    /sbin/ip rule add from FAILOVER_IP/32 table 223
}
Windows 2003 Server
First of all, you must add a new device:
- Start -> Configuration panel -> New device
- Click on “next”, then tick “Yes, I have already connected the device” and “validate“
- Select the last element of the list: “Add a new device” and “validate“
Choose the second option:
- “Install the device that I select manually in the list (experimented user)” then “validate“
- Select “Network card” then in the next window, search the “Microsoft producer” and select “Microsoft loopback card“
Finish the installation of this device.
By installing the loopback card, a new interface appeared:
- “Connection to the local network 2” (except for HG servers which have a three interfaces)
It’s now time to add the failover IP address to the interface:
- In “Start menu”, select “Configuration panel”, “Network connections” then “Connection to the local network 2“
- Click on “Properties“
- Select “Internet Protocol (TCP/IP)“
- Click on “Properties“
- Enter the Ip address corresponding to your failover IP and 255.255.255.0 as netmask. Let the others fields empty
- Validate all the open windows
Finally you must correct the netmask by 255.255.255.255 but it isn’t allowed by the dialogue box of IP configuration; It’s necessary to modify the information in the registry database:
- In “Start menu”, click on “Execute”, then type regedit
- Type Ctrl-F3 in order to open the search window, then indicate the failover IP address and click on “Next“
- Once you found the IP, double-click on “SubnetMask” parameter and change 255.255.255.0 by 255.255.255.255 and “validate“
- Continue the search by typing F3 do the same modification again
- Close the register editor
Finally, to validate the modifications, reboot the interface:
- “Start”, “Configuration panel”, “Network connections” and do a right click on “Connection to the local network 2” then click on “Desactivate“
Wait for few seconds and activate the network connection again.
Windows 2008/2012 Server
By default on Windows 2008/2012 servers are using DHCP in the network configuration. If you have already configured a failover IP or you have already placed your fixed IP configuration then skip this step.
You must first change the DHCP configuration on the network for a fixed network configuration.
Open a cmd or powershell console and type the following command:
ipconfig /all
This will give you:
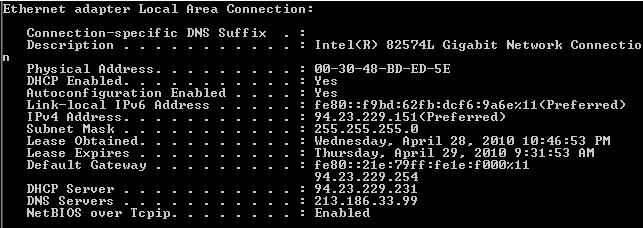
Result of “ipconfig /all” command
Get your IPv4 address, subnet mask and default gateway from this screen.
In our example the IP is : 94.23.229.151
then:
- Go to Start >> Control Panel >> Network and Internet >> Network and Sharing Center >> Change adapter settings (on the left menu)
- Right-click on Local Area Connection
- Select Properties
- Select Internet Protocol Version 4 (TCP/IPv4) and then click Properties
- Check “Use the following IP address” and replace the main server IP, subnet mask, default gateway obtained through the ipconfig command above (in preferred DNS server, put 213.186.33.99)
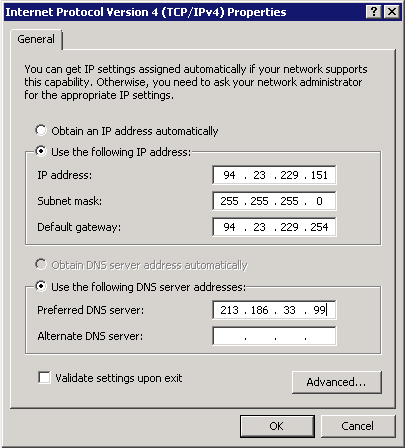 Internet Protocol Version 4 (TCP/IPv4) Properties
Warning
Do not make a mistake on this information, or the server will no longer be available and you’ll have to correct the network configuration using mode Win Rescue.
Then click on Advanced (in the TCP/IPv4 properties dialog)
 Internet Protocol Version 4 (TCP/IPv4) Properties
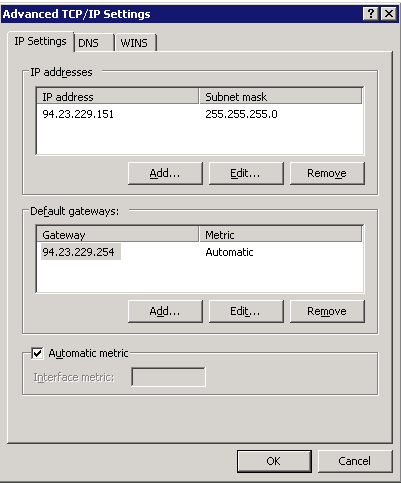
in the IP address section, click add:

Advanced TCP/IPv4 Settings
Fill it in with your IP failover and netmask 255.255.255.255.
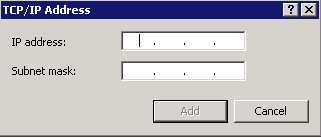 TCP/IP Address
Click Add.
Your failover IP is now usable.
FreeBSD
Determine the name of your primary network interface. You can use the ifconfig command for this operation:
ifconfig
Gives the following output:
ifconfig
nfe0: flags=8843 metric 0 mtu 1500
options=10b
ether 00:24:8c:d7:ba:11
inet 94.23.196.18 netmask 0xffffff00 broadcast 94.23.196.255
inet 87.98.129.74 netmask 0xffffffff broadcast 87.98.129.74
media: Ethernet autoselect (100baseTX )
status: active
lo0: flags=8049 metric 0 mtu 16384
options=3
inet6 fe80::1%lo0 prefixlen 64 scopeid 0x2
inet6 ::1 prefixlen 128
inet 127.0.0.1 netmask 0xff000000 v comsdvt#
The name of the interface is therefore: nfe0.
Copy the file /etc/rc.conf so that we can roll-back at any time:
cp /etc/rc.conf /etc/rc.conf.bak
Edit the file /etc/rc.conf:
editor /etc/rc.conf
Add the following line at end of the file: ifconfig_INTERFACE_alias0=”inet IP_FAIL_OVER netmask 255.255.255.255 broadcast IP_FAIL_OVER”
Replace respectively INTERFACE and IP_FAIL_OVER with the name of the interface discovered in step no 1, and then IP_FAIL_OVER with your own failover IP.
Example:
ifconfig_nfe0_alias0="inet 87.98.129.74 netmask 255.255.255.255 broadcast 87.98.129.74"
Restart the network interface:
/etc/rc.d/netif restart && /etc/rc.d/routing restart
Note
Type this command in two separate steps in case of loss of access to your server.
If the configuration were done correctly, the specified IP in the file must be “pingable” from the outside.
Solaris
Determine the name of your primary network interface. You can use the ifconfig command for this operation:
ifconfig -a
Which will give a result like this:
ifconfig -a
lo0: flags=2001000849 mtu 8232 index 1 inet 127.0.0.1 netmask ff000000 e1000g0: flags=1000843 mtu 1500 index 2 inet 94.23.41.167 netmask ffffff00 broadcast 94.23.41.255 ether 0:1c:c0:f2:be:42
The name of the interface is therefore: e1000g0.
Create the file /etc/hostname.INTERFACE:ALIAS:
editor /etc/hostname.e1000g0:1
in this file enter this: IP_FAIL_OVER/32 broadcast + up Replace IP_FAIL_OVER with your Failover IP. For example:
188.165.171.40/32 up
Restart the network interface:
svcadm restart svc:/network/physical:default
Ping the IP, if the configurations were done correctly it should reply.